Cart
0

Last Updated: October 25, 2026
Quick Summary
To pack for backpacking without overpacking, start with a written packing list and a base weight target, then load heavy gear like food and fuel against your spine while light camp items go at the bottom. A common starting target for a weekend trip is a base weight under 20 pounds.
- Base weight is your pack and contents minus food, water, and fuel.
- Put your sleep system at the bottom and daily items in the lid.
- Rent or borrow the big three for your first outing.
- Plan roughly 1.5 to 2 pounds of food per person per day.
- Leave duplicate clothing and untested items behind.
Table of Contents
- Start With a Backpacking Packing List and a Base Weight Target
- How to Pack a Hiking Backpack: A Step-by-Step Loading Method
- Build a Beginner Backpacking Gear List Without Overbuying
- Shelter, Sleep System, and Clothing Layers That Earn Their Weight
- What to Pack for a Week-Long Backpacking Trip
- Adjust Your Pack for Season, Climate, and Trip Conditions
- Common Packing Mistakes and What to Leave Behind
- Run a Final Pack Audit, Then Shop Gear at Pinnacle Trail Gear
- Frequently Asked Questions
Start With a Backpacking Packing List and a Base Weight Target
Most people pack for backpacking by throwing everything they own into a pile and hoping the bag zips shut. Then they carry the consequences for miles. Learning how to pack for backpacking starts with two numbers, not a shopping cart: a written packing list and a base weight target.
So what is base weight? Base weight is the total weight of your pack and everything inside it, minus food, water, and the fuel you will burn. It is the number that tells you how your setup actually carries.
Calculate Your Base Weight Before You Buy Anything
Weigh your empty pack first, then add each item as it goes in. A kitchen scale works fine for small gear. A luggage scale handles the loaded bag.
Here is the math:
- Empty pack weight
- Plus shelter, sleep system, and clothing
- Plus kitchen, water treatment, and safety gear
- Equals your base weight
A common starting target for a weekend trip is a base weight under 20 pounds. Many beginners find that hard at first. That is normal. The point is to know your number, not to hit a perfect one on day one.
The Core Categories Every List Needs
Every backpacking packing list, no matter the trip length, breaks into the same buckets:
- Carry system: pack, rain cover, stuff sacks
- Shelter: tent or tarp, stakes, footprint
- Sleep system: sleeping bag, sleeping pad, pillow
- Clothing: layers, rain gear, spare socks, hat
- Kitchen: stove, fuel, pot, spork, lighter
- Water: bottles or bladder, filter or treatment
- Safety and hygiene: first aid, headlamp, map, toiletries
- Food: meals, snacks, and a way to hang or store them
Write the list down. A written packing list beats memory every time, especially at 6 a.m. on departure day.
How to Pack a Hiking Backpack: A Step-by-Step Loading Method
Here is the method we recommend for loading a pack. It puts heavy items close to your spine and light items far from it, which keeps you balanced on uneven ground. The goal is a load that rides against your back, not one that hangs off it.
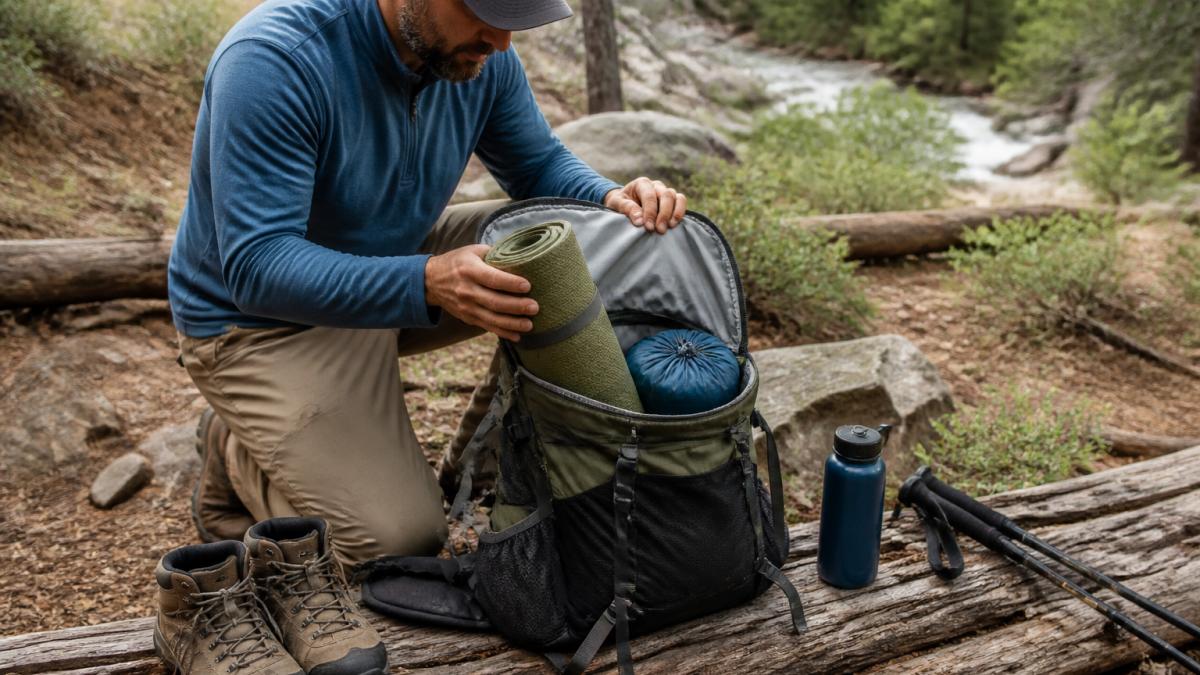
- Lay everything out first. Group items by category so nothing gets buried. This is also your last chance to spot duplicates before they add ounces.
- Put your sleep system at the bottom. The sleeping bag goes in a stuff sack in the lowest compartment. It is light, compressible, and you will not need it until camp.
- Load heavy gear against your back. Food, stove, fuel, and water sit in the middle of the pack, close to your spine and between your shoulder blades. This is the heaviest zone, and keeping it near your center of gravity reduces the lever effect on your shoulders.
- Add lighter layers on the outside. Clothing and puffy layers go toward the front of the pack, away from your spine. Bulky but light items belong here.
- Keep daily items on top. Rain gear, snacks, map, headlamp, and water treatment belong in the lid or top pocket where you can reach them without unpacking.
- Strap bulky gear outside, carefully. Tent poles and a foam pad can ride on the exterior, but keep them tight and symmetrical. A lopsided load pulls you off balance on sidehill traverses.
- Cinch every strap. Start with the hip belt, then shoulder straps, then sternum strap, then compression straps. Loose straps swing and rub; compression straps pulled last keep the load from shifting.
Where Each Item Goes and Why
The logic is simple. Heavy weight near your center of gravity means less strain on your shoulders and hips. Frequently used items go on top so you are not unpacking the whole bag to find a snack. Items you need only at camp, sleep system, camp clothes, stove, go deep.
A useful mental model is to divide the pack into three zones:
- Bottom zone: sleep system and camp-only items. Light, bulky, accessed once a day.
- Middle zone (against your back): food, fuel, water, and the heaviest gear. This is the load-bearing core.
- Top and lid: rain gear, snacks, navigation, headlamp, first aid. Accessed many times a day.
Watch out: strapping a heavy water bottle or stove to the outside of the pack pulls weight away from your back and throws off your balance on descents. If you must carry extra water on the exterior, split it evenly on both sides.
Adjust the Fit After the Pack Is Loaded
A loaded pack carries differently than an empty one, so fit it after it is full. Loosen the shoulder straps and compression straps, put the pack on, and fasten the hip belt first so the belt sits on your hip bones, not your waist. Then tighten the shoulder straps until the pack hugs your back, and set the sternum strap at a height that lets you breathe without pressure. Finally, snug the load-lifter straps at the top of the shoulders to pull the load closer to your body.
Pro Tip
Repack at least once on a shakedown hike. Most hikers find one or two items that belong in a different zone after the first mile, and moving them before a long trip is easier than fixing a hot spot on the trail.
Watch Out
Do not overload the lid or top pocket with heavy items. A top-heavy pack feels stable standing still but pitches you forward on steep descents.
Build a Beginner Backpacking Gear List Without Overbuying
New hikers often buy too much gear before their first trip. A beginner backpacking gear list should be short and honest. Start with what you already own, then fill gaps one trip at a time.
Our advice: rent or borrow the big three (pack, tent, sleeping bag) for your first outing if you can. Buy the small stuff that lasts, like a headlamp and water filter. Then upgrade the big items once you know what you actually want.
Skip the gadgets. A titanium spork is nice. A solar-powered gadget charger usually is not worth the ounces on a short trip.
Shelter, Sleep System, and Clothing Layers That Earn Their Weight
Your shelter and sleep system are where weight adds up fastest. A tent, sleeping bag, and sleeping pad together can easily dominate your base weight, so choose each one with purpose.
For clothing, follow the layering rule:
- Base layer: wool or synthetic shirt and leggings
- Mid layer: fleece or light puffy jacket
- Outer layer: rain gear and wind shell
- Extras: hat, gloves, spare socks
Avoid cotton. Wool and synthetic clothing dry faster and keep you warmer when damp. Duplicate clothing is dead weight, so pack one set to wear and one dry set for camp.
What to Pack for a Week-Long Backpacking Trip
A week-long trip changes the math. You cannot carry seven days of everything, so plan around resupply points and repackage food before you leave. The two numbers that drive the plan are calories per day and the longest stretch between water sources.
Food and Water Quantities for Multi-Day Routes
A common approach is roughly 1.5 to 2 pounds of food per person per day, adjusted for your size and effort level. That range works out to roughly 2,500 to 3,500 calories per day for many hikers, but appetite on the trail varies widely, some people eat far less in the first days and more later. Pack food you know you will eat, not food you think you should eat.
Repackage meals into zip bags to reduce bulk and trash. Remove cardboard, cans, and any packaging you will not need, and combine breakfasts or dinners into shared bags when you can. Carry out what you carry in, so plan trash space.
For water, carry capacity for the driest stretch between sources, not the whole trip. A filter lets you refill as you go.
Fuel is the third quantity people forget. A common planning figure is roughly 0.5 to 1 ounce of canister fuel per person per day for simple boiling and rehydrating, with more for cold weather, wind, or melting snow.
| Trip Length | Food Planning | Water Strategy | Fuel Planning |
|---|---|---|---|
| Weekend (2-3 days) | Pack all meals | Carry 2-3 liters, refill at sources | One small canister |
| 4-5 days | Pack all, one resupply | Filter as you go | One large canister or refill |
| Week-long | Two resupply stops | Carry for the longest dry stretch | Large canister plus backup, or liquid fuel |
Build a Resupply Plan Before You Pack
A week-long pack is really a series of shorter packs. Map your route and mark every place you can buy food, pick up a cache, or refill water. Then divide the trip into segments between those points and pack only the food and fuel for the longest segment.
A worked example: a seven-day route with a resupply stop on day four means you carry three days of food out of town, then four days after resupply. Pack the first segment lighter if the terrain is steep, and save the heaviest food for the flatter miles after resupply.
Key Takeaway
Plan food, water, and fuel by segment, not by total trip length. The longest stretch between resupply or water is the number that sets your pack weight.
Watch Out
Do not assume water sources will be flowing late in the season. Carry enough capacity to reach the next reliable source even if a spring or creek is dry.
Adjust Your Pack for Season, Climate, and Trip Conditions
Your load should change with the weather. A summer trip and a cold-weather trip are not the same pack.
In hot, dry conditions, carry more water capacity and lighter layers. In cold or wet weather, add insulation, rain gear, and a warmer sleep system. For winter trips, expect a heavier pack and plan shorter miles.
Check the forecast the night before. Then test your setup at home by walking around with the loaded pack. If it rubs or rides wrong, fix it before the trail does.
Common Packing Mistakes and What to Leave Behind
The biggest mistakes are predictable. People overpack clothing, carry non-essential items "just in case," and skip the written list.
Leave behind:
- Duplicate clothing beyond one dry set
- Heavy camp chairs and large comfort items
- Full-size toiletries
- Extra electronics and chargers
- Anything you have not tested
A common mistake is packing for fear instead of for the trip. If you have not used an item on a shakedown hike, it probably does not belong in the bag.
Run a Final Pack Audit, Then Shop Gear at Pinnacle Trail Gear
Before you leave, empty the pack and repack it from your list. This final pack audit catches forgotten items and dead weight. Weigh the bag one last time and confirm your base weight is where you want it.
At Pinnacle Trail Gear, we stock thoughtfully selected outdoor essentials and performance-ready apparel for trips of every length. Our gear is chosen to keep you prepared through changing conditions and challenging terrain, and to simplify preparation so you spend less time sorting gear and more time outside.
Get started with Pinnacle Trail Gear and pack with confidence for your next trip.
Frequently Asked Questions
What is the 10-pound rule for backpacking?
The 10-pound rule is a target for base weight, meaning everything in your pack except food, water, and fuel. Hitting 10 pounds or less requires lightweight gear choices and ruthless editing, and it suits experienced hikers on three-season trips. Beginners should aim for 15 to 20 pounds base weight first, then trim weight as they learn what they actually use. Weigh every item on a kitchen scale before your first trip so you know where the pounds are coming from.
How much should a backpack weigh for a multi-day hike?
A common guideline is 20 percent of your body weight for a fully loaded pack, including food and water. A 160-pound hiker would target roughly 32 pounds total. For a two-night trip that usually means 15 to 20 pounds of base weight plus 4 to 6 pounds of food and 2 to 4 pounds of water. Weigh your loaded pack the night before you leave. If you are over target, cut duplicate clothing and repackage food into smaller portions before removing safety items.
How do you pack food and water for backpacking?
Plan roughly 1.5 to 2.5 pounds of dry food per person per day, depending on effort and appetite, and repackage everything into zip-top bags to reduce bulk. Carry 2 to 4 liters of water capacity and check your route for reliable sources; on dry stretches you may need to carry a full day's supply. A water filter or treatment tablets save weight compared with hauling all your water. Keep food in a hang bag or bear canister where required and store it away from your sleeping area.
What should I leave out of my backpacking pack?
Leave behind duplicate clothing, cotton items, heavy camp chairs, glass containers, and anything you packed for a just-in-case scenario you cannot name a real use for. A good test is to lay everything out and ask whether you used each item on your last trip. Non-essential items add up fast: a folding stool, a second knife, and a full-size towel can easily add 3 pounds. Keep your first-aid kit and navigation tools, and cut comfort extras instead.
Packing well is a skill, and it rewards practice. If you want dependable gear that holds up trip after trip, Pinnacle Trail Gear is here to help with rugged camping essentials, performance-ready apparel, and a curated selection that cuts the guesswork. Get started with Pinnacle Trail Gear and hit the trail prepared.